If you haven't been on one of our world famous layout tours, this is your chance. Children of all ages are welcome. I would suggest that if you bring children of the finger-poking-age, ask for a volunteer to help act as temporary guardian for each child not accompanied by a parent. We will finish with lunch at the Copper Caboose.
Hobby Shop News - Wings N Things - LifeLike SW9/1200 in N-scale (smoothest running switcher I have ever seen), and 1998 M.R. Planning Guide. Library Books Out There are a number of library books that have been out for a long time. If you have any of these, see Marshall Higgins. TPRHS Web Page The Texas Panhandle Railroad Historical Society has a web page maintained partly by our member, Jeff Ford. Check it out at www.geocities.com/Heartland/Meadows/5732/ New Scenery Technique From jdennis@acslink.net.au - January 28, 1998 - Shaping foamYes, obviously the sharper the better. I too discovered a carving knife works well with foam, although in my case it was an electric knife. Sliced through the stuff without too much mess. Of course, fine tuning the shape with a surtool generated mountains of little white foam.
If you want mountains of foam bits then try what I did on our club layout. We built a rather large mountain out of blue foam stacked and glued together. I tried a kitchen knife but some of the cuts had to be deep and the knife got hung up because it could 'push' the cut foam away to continue. I tried a freezer knife - nasty tool that. Its got saw teeth on one side and a regular knife blade on the other. The saw teeth side is used to cut frozen meat by sawing it apart - that makes a path for the knife so you can cut deep into something without much give without getting stuck. I found that way slow and hard on the hands. The mountain was roughly 3 ft high with a foot print of 10x10 ft. Some wise guy suggested I might be better off with a chain saw. So the next week at the meeting I used my dad's electric chain saw to shape the mountain of foam. I figured I'd have a horrible clean up job but thanks to static electricity it wasn't that bad. Took about 2 hours to carve and another 2 to clean up with a shop vac. Most of the dust didn't get far from the work area. Chain saw was easy to clean and suffered no permanent damage. I wouldn't try this with a gas saw - at least not in a closed area. The 14" bar gave me nice rolling contours that I needed for the Eastern hills we were modeling and I needed to do very little shaping with other tools. And I have witnesses and photos to prove this is a true story. ;^)
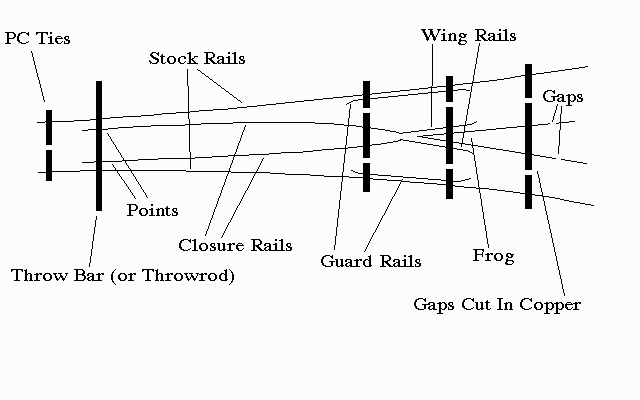
Hand-laying Track and Turnout SIG For those foolhardy enough to attempt it (or just curious), we will re-schedule another practice session whenever our schedules allow. Call me (Jack Seay, work# 792-6512) jackseay@sbcglobal.net mailto:jackseay@usa.net, . The last one was postponed due to the Olympics. I didn't realize it was at the same time when I scheduled it. I would especially like to see someone lay HO track and a turnout.The rail is classified by a code number that signifies thousandths of an inch in height. Code 40 track is 40/1000 of an inch high. Making turnouts with it can best be described as a learning experience. This diagram shows the parts used in these turnouts.
Make the point, closure rail, and wing rail for each side from one continuous piece of track. The PC ties are printed circuit board material from Clover House. It is fiberglass with copper on top and bottom. Solder the track to the copper, and cut the copper in several places to prevent short circuits.
Solder the throw bar to the points, but not to the stock rails. Drill a hole in one side of the throw bar to connect (using a brass wire) a ground throw, electric switch, or switch machine. This will move the points to one side or the other, routing the train. It also changes the electrical polarity to all the track in the center of the turnout. The stock and guard rail on one side will be always negative and on the other side always positive. Everything else will be either negative or positive, depending on the position of the points.
Some people depend on point contact with the stock rail to conduct power; some use a small electric SPST (single-pole single-throw) switch. Glue a thin piece of acetate to the top of the throw bar (outside the points, see below). This prevents the copper from shorting out against the stock rails. 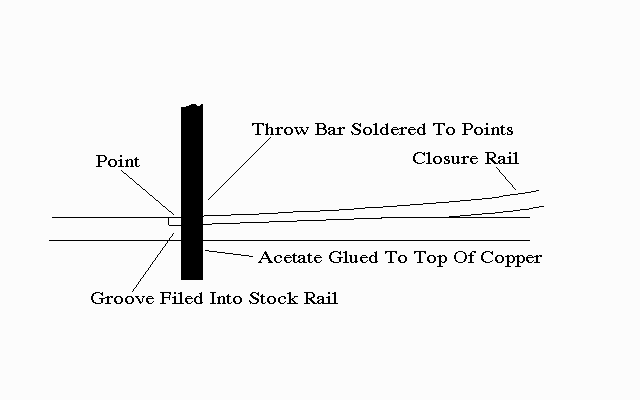
The guard rails aren't there just for looks. If you look at a wheel, there is a flange or lip on the inside that runs along the track. This keeps the wheel running straight along the track. It takes two flanges for each axle to keep the car or loco on the rails. To cross over another rail, as happens just in front of the frog, there must be a gap in the other rail for the flange to pass through. When this happens, there is now only one flange keeping that pair of wheels on the track. This could present the problem of the wheels falling off the tracks and derailing. So the solution is to add a guard rail next to the stock rail. This will keep the flange running straight along the track.
If you cut a turnout in half, (eliminating the points and throw bar), you could put a throw bar on the track that leads up to the turnout and move the track instead. This was done in the early part of the 1900's, and is called a stub switch. I recommend learning to build stub switches first. They are much easier to make than point switches.
The diagram below is of a wye turnout, which is easier to build than either a left or right turnout.
In larger rail, such as code 83 or 100, spikes are used instead of soldering to PC board. Code 40 and 55 rail is used in N and Z scales, and even sometimes in HO. I recommend buying pre-weathered rail. You will need to sand or file the bottom of the rail lightly before using, so the solder will stick, but that is easier than trying to weather a completed turnout. Weathered rail looks so much more realistic. Micro Engineering makes Rail Weathering Solution you can brush on track to darken it.
After making a few turnouts, hand-laying track will seem like a piece of cake. I showed some boys how to hand-lay code 40 Z-scale track in just a few minutes at the Museum. When I first read that some Z-scalers hand-laid their track, I said "no way". But with the proper tools and techniques, it's easy.
The turnouts on the other hand, require much practice, even if you have all the tools and techniques. I have heard that in Germany, apprentice machinists start by doing nothing but filing for 6 months, to get the feel of the metal, and learn its' working characteristics. I recommend they make turnouts for 6 months.
I have built 14 turnouts so far, and each time, I learn something about working with the rail. Very gradually, I am acquiring a feel for how much pressure to put on the file or pliers. I am also learning how to bend the rail to the right curvature. This is something I think you have to learn by doing, and doing over and over. It fascinates me. I was a strange child.
Start by taping the paper template to a piece of wood or masonite. The template is a full-size drawing, similar to the one above. You will need one for each type turnout you build. Photocopy it, and use the copies. Glue the PC ties to the template with white or super glue.
There are two ways to make the frog. You can file two pieces of rail, and solder them together, or you can take one piece of rail, bend it slightly, clamp in a vise, and file. This is the method I prefer, as it is quicker and easier. See Railroad Model Craftsman, July 1996. 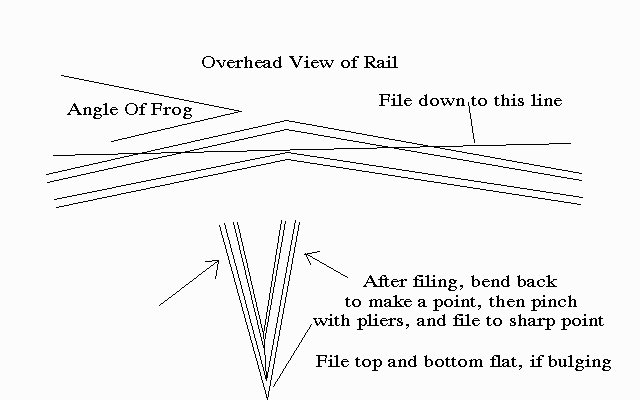
Before soldering the rail to the PC ties, pre-solder the ties. Put just a little paste rosin flux on each tie, then a very small amount of solder, then a little more paste flux. That way, one hand is free to position the rail and one to hold the soldering iron. I use a 30 watt iron. I haven't tried other wattages yet. Hold the frog in position with a needle file or your finger (not too close). Touch the soldering iron to the top of the rail until you see the solder melt. Lift the soldering iron while still holding the frog down for a second. If it didn't stick, add more solder and flux.
Follow the same basic procedure to solder the other pieces to the PC ties. Next, do the points. I tape a straight piece of rail to the edge of a six inch steel rule using clear tape. This holds the rail straight while filing the point. I tried using a Dremel tool and electric whet stone, but found that a six-inch mill bastard file works best. Getting a straight, smoothly ground edge is important here.
Bending this piece of rail to form the closure and wing rail and soldering it in place is the most difficult part of making the turnout. The closure rail needs to be aligned with the frog using a straightedge. Getting the correct curve on the closure rail is a tricky balancing act, since it must be lined up with the frog, and gradually curve to intersect the stock rail at the correct angle. Bend the wing rail by holding the rail with needle-nose pliers. The wing rail needs to be parallel to the frog. If the closure rail curves too sharply, it could cause problems with some locos. If it curves too slowly, the points will intersect the stock rail at the wrong angle and won't fit into the grooves cut in the stock rails.
Expect to ruin many of your early turnouts learning the proper techniques. Precise templates or jigs help. You can solder the points to the throw bar now or wait until after the stock rails are in place. I have tried both ways and haven't decided which way is best.
Next, file the grooves in the stock rails, and check them against the points for a good fit. If you are making a left or right turnout, one stock rail will be straight. To make the curved stock rails, pull the rail along the table edge to make a smooth bend. Check the curve by laying it on the PC ties and testing with the NMRA gauge to make sure it is parallel with the closure rail on the opposite side.
To solder the stock rail down, hold it in position with a three-point track gauge at one end, and the NMRA gauge next to where you will solder. After it is down, test all along the track using the NMRA gauge. Unsolder and resolder where the distance between rails isn't right. Lastly, solder the guide rails down using the NMRA gauge. Clean the flux off with a toothbrush and rubbing alcohol, peel off the template, and you are done.
It still takes me four or five hours to make a turnout. A skilled craftsman can make one in 1/2 to one hour. Speed comes only with much practice.
If you still want to hand-lay track, but not scratch-build turnouts, can order "skeleton" turnouts through Walthers. These can also be used as patterns in making your own.
There is an N-scale club in San Diego that has all hand-laid code 40 track and over 200 code 40 turnouts on their club layout.
Now for the easy part: hand-laying the rail. That will be another article.
Mar.
2 - Meeting 7:30 Highland Baptist Activity Center
16-20 - Godeke library setup
April
4,5 - Abilene Railroad and Buffalo Gaps Arts Festivals - Civic Center, Sat 10-6, Sun 11-5
18,19 - Arts Festival - fairgrounds
May
9 - Layout Tour 8:30 am Highland Baptist
17 - Albuquerque RR Fair, 9-5, State fairgrounds
30,31 - Amarillo show
June
3-7 - N-scale East Conv., Orlando, FL
18-21 - Lone Star Region Conv., New Orleans Airport Hilton, Kenner, LA (for members of NMRA and LSR)
July
20-26 - NMRA and N-scale Conv., K.C. MO
Sept.
23-26 - Narrow Gauge Conv., Co. Spgs. CO